Modern vehicles are equipped with sophisticated emission control systems designed to reduce harmful pollutants. One critical part of that system is the EVAP (Evaporative Emission Control) system, which captures fuel vapors from the gas tank and prevents them from escaping into the atmosphere. When a EVAP leak occurs, those vapors escape, triggering the check engine light and often leading to failed emissions tests. Learning how to diagnose and fix an evaporative emission system leak is an essential skill for anyone who enjoys DIY car repair or wants to save money on professional diagnostics.
The EVAP system is made up of several components, including the fuel tank, gas cap, purge valve, vent valve, charcoal canister, and connecting hoses. The system works by storing fuel vapors in the charcoal canister when the vehicle is off and later routing them to the engine to be burned during combustion. A leak anywhere in this system can disrupt its operation. Common causes of an EVAP system leak include a loose or faulty gas cap, cracked hoses, broken valves, or a damaged canister. Because the system operates under pressure and vacuum, even a tiny crack can cause problems that are difficult to detect without the right tools.
The first sign of a EVAP leak is typically the check engine light. When the onboard diagnostics system (OBD-II) detects pressure inconsistencies, it stores a trouble code related to the evaporative system. The most common codes are P0440, P0442, and P0455, indicating minor or major leaks. A code scanner can read these codes and help narrow down the issue. If you’re dealing with an evaporative emission system leak, you should start by checking the simplest possible cause: the gas cap. Make sure it’s tightened until it clicks. A loose or cracked gas cap is one of the most common and inexpensive causes of EVAP trouble codes.
If the gas cap is fine but the check engine light remains on, the next step is to perform a visual inspection of the hoses and connections. Look for any signs of wear, cracks, or disconnection, especially near the charcoal canister and the fuel tank area. These rubber hoses are exposed to heat, debris, and vibration, which can cause them to deteriorate over time. Replacing damaged hoses is a simple and inexpensive EVAP system leak repair that most DIYers can do with basic tools.
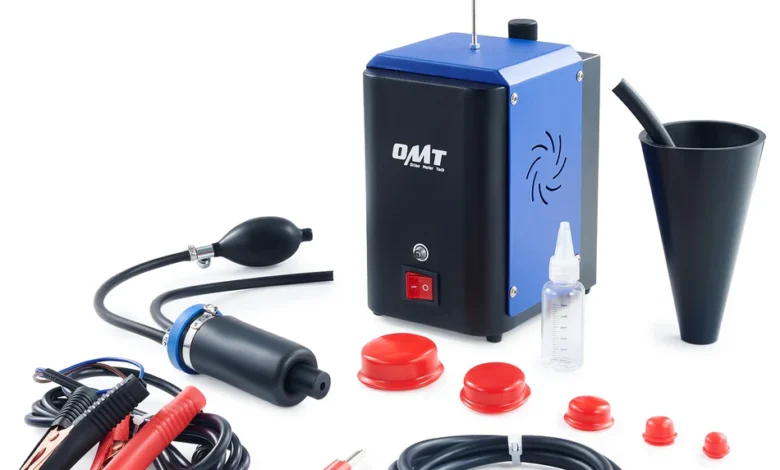
For leaks that aren’t visible, an automotive smoke machine test is one of the most effective diagnostic methods. This specialized device introduces smoke into the EVAP system under low pressure. Any escaping smoke will reveal the exact location of the leak, whether it’s from a small crack in a hose or a faulty valve seal. Many auto repair shops use this method because it’s fast and precise, but car enthusiasts can also perform it at home using a DIY smoke tester. When conducting the test, seal the system, connect the smoke machine to the service port, and observe for visible vapor escaping from any part of the system.
If the smoke test identifies a faulty purge or vent valve, those components are relatively straightforward to replace. The purge valve, typically located near the engine, controls the flow of fuel vapors into the intake manifold. A stuck-open valve can cause rough idling or starting problems, while a stuck-closed valve prevents proper vapor flow. The vent valve, often mounted near the charcoal canister, allows air to enter the system when needed. Replacing these parts is a common EVAP leak repair and usually involves unclipping electrical connectors and hose fittings.
For a damaged charcoal canister, replacement might be necessary. The canister contains activated carbon that traps fuel vapors. Over time, it can become saturated or cracked, leading to leaks and error codes. While it’s a more involved repair, it’s still manageable for skilled DIY mechanics. Make sure to disconnect the negative battery terminal before starting the replacement and follow your vehicle’s service manual for specific instructions.
When it comes to EVAP leak repair cost, it varies widely depending on the source of the problem. A simple gas cap replacement can cost as little as $10–$30, while replacing a vent valve or purge solenoid might range from $100–$250, including parts and labor. If the charcoal canister needs replacement, the repair could exceed $400–$600. Using a smoke machine test at a shop can cost around $75–$150 for diagnostics alone, though many enthusiasts save money by investing in their own test equipment.
Preventing EVAP system leaks in the first place is easier than many think. Regularly inspect hoses and clamps for cracks or looseness, especially in older vehicles. Always ensure your gas cap seals tightly after refueling, and consider replacing it every few years as part of your maintenance routine. Avoid overfilling your gas tank, since that can saturate the charcoal canister and cause premature failure. Periodic visual checks and code scans can help catch small leaks before they develop into larger problems.
For those who enjoy working on cars, understanding the evaporative emission system is a rewarding challenge. It combines mechanical and electronic elements, giving DIYers an opportunity to expand their diagnostic skills. Learning to use a smoke tester for EVAP leaks or reading OBD-II codes accurately makes troubleshooting much easier. It’s also an environmentally responsible task—repairing a EVAP system leak helps prevent harmful fuel vapors from entering the atmosphere, reducing pollution and improving fuel efficiency.
When performing a EVAP system leak repair, always take safety precautions. Fuel vapors are flammable, so work in a well-ventilated area and avoid open flames or sparks. Wear gloves and safety glasses when disconnecting hoses or removing components near the fuel system. Once repairs are complete, clear the check engine light with a code reader and drive the vehicle for several miles to allow the system to run its self-test. If the light stays off, your repair was successful.
A properly functioning evaporative emission system ensures your vehicle runs efficiently and stays compliant with emissions regulations. Ignoring an EVAP leak may not immediately affect how your car drives, but it will cause increased emissions, potential fuel loss, and can lead to failed inspection tests. Moreover, unresolved leaks can cause long-term damage to emission components, resulting in more expensive repairs later on.
In conclusion, diagnosing and fixing an EVAP system leak is a task well within reach for the average car enthusiast. With patience, the right tools, and an understanding of how the system works, you can identify the source of a leak, perform an automotive EVAP smoke machine, and carry out the necessary repairs yourself. Not only will this save you money on EVAP leak repair cost, but it will also improve your vehicle’s performance and reduce its environmental footprint. Whether you’re tackling a minor leak or replacing major components, maintaining your evaporative emission system keeps your car running cleaner, smoother, and more efficiently for years to come.